How to sit at your desk

This had made all the difference for me lately, so I wanted to share with you! Our bodies aren’t built for sittin’ on our behinds all day, but a correct desk setup and good posture can help with some of the negative effects that constantly working at a computer can have on our bodies.

*****

A few weeks ago I slowly started feeling an ache down the right side of my back.

It felt like a strained or pulled muscle.

When I would wake up in the morning it was fine, but then throughout the day the pain would set in…and seemed to be just getting worse and worse! One night when Tuna was out and about he came home to find me lying on the floor (typical) because it hurt to sit, stand, etc (not typical). Something was definitely wrong. But what the heck was causing it?

I was still in winter/hibernation-against-exercise mode, so I didn’t do anything working-out wise to throw out my back.

The next day at work, I figured it out.

The onset of the pain correlated with the amount of time spent hunching at my desk all day at work (and at night, when fiddling around on the blog). Every minuscule movement of the mouse confirmed it.

A little bit of research told me I was sitting with my desk way too high (so that I would reach up to type) and basically doing ALL THE WRONG THINGS. i.e. sitting on my feet, crossing my legs, putting the chair up too high, having the mouse extremely far out from the side of the keyboard, etc.

THIS is a great article about posture in the workplace:

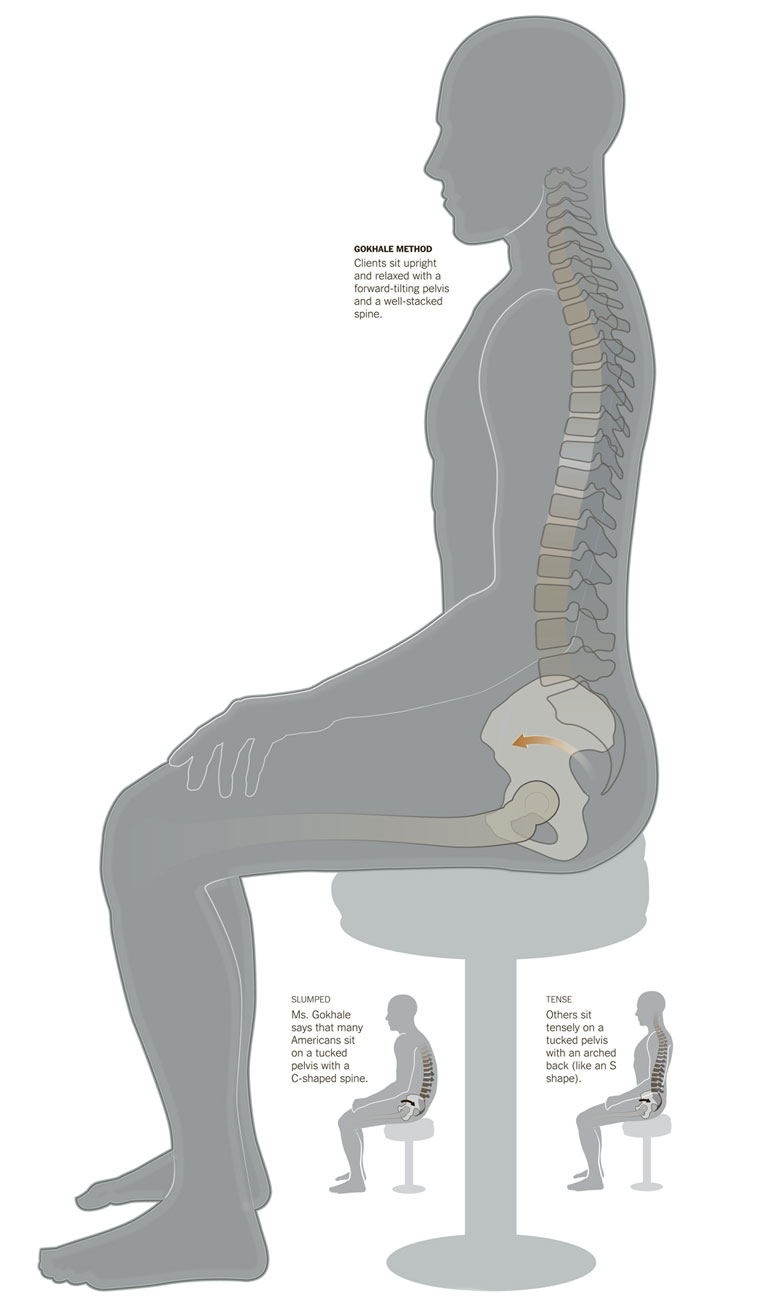
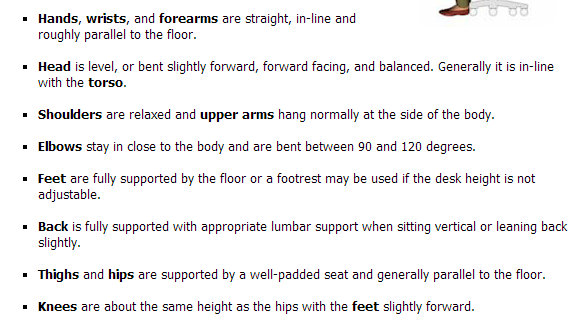
Here’s how you SHOULD be set up to sit at your desk.

The department of labor suggests:

osha sitting rec

Luckily, I realized the legs on my desk are adjustable and I lowered that, along with my chair (I’m tall, 5’9”). Now I try to stretch my arms and back throughout the day, and am really trying to be constantly aware of how I’m sitting.

Since taking all of these factors into account my back is feeling almost back to normal. Hopefully with a lot of practice, good posture will come more naturally!

Tell me:

How is your desk set up at work?

If you’re a blogger, where do you blog from? The couch? A table? How do you sit?

Do you ever get back pain from your mouse/computer?

Star-Cut Watermelon

Don’t have enough skill time to whip up a gorgeous red, white, and blue cake to take to a 4th of July barbecue?

I don’t either.

Thank gawwwd summertime allows for fruit to be a more than acceptable potluck dish. I may not be a master baker, but I can cut up fruit.

This year I was feeling a little extra festive and came to the conclusion that plain old squares of watermelon were just not fancy enough.

star-cutwatermelonmain

Too bad I forgot to look for a legit star cookie cutter at the store. But I wasn’t going to let that deter me from forcing this melon to be snazzy.

Luckily cookie cutters are only kind of hard to cut and re-bend. Sorry, no Christmas tree shaped cookies this year.

Instead, we will have fucked up stars.

star-cutwatermeloncutter

It’s the thought that counts, right?

star-cutwatermelon2

A Peek Inside My Kitchen

Like I’ve said before, I’m slightly obsessed with keeping healthy food in my apartment. If I have junk food around, I will most definitely eat it. All of it.

To prevent a ridiculous amount of potato chip consumption, I’m at the point where I keep a nutrient stocked pantry/fridge most of the time.

It’s pretty cool to be able to cook a variety of dishes on any given night by throwing together ingredients that I already have in the fridge. Before I started eating clean, that never would have happened.

To give you more of an idea of what my normal food sitch looks like, I thought it could be fun to take a peek inside my kitchen.

a peek inside1

Let me just say that in no way do I think I am a pantry expert. Hell, I’m still figuring out which veggies need to be refrigerated and which ones don’t.

fruitbasket1My dream pantry would be more along the lines of this:

But I have come up with a few tricks that make my food storage space more appealing to me!

Fridge

fridge3I like to keep everything where it’s easily visible. Otherwise, I’ll totally forget what I have and end up wasting or buying double of things I already have in stock.

fridge2Every time I buy fresh produce from the farmer’s market or the grocery store, I keep the little green bins it comes in. Not only are they cute, but they also help me keep everything organized.

Yup, you are seeing my lunchbox in there. I pack my lunch the night before I eat it, and keep it all packed up so in the morning I can literally just grab it and go.

Freezer

My freezer isn’t as full as I’d like it to be. I plan to start making more leftovers to freeze for future meals when I get the chance to experiment with my crock-pot a little more.

freezer1Frozen fruit = necessary for smoothies. When I first started making smoothies, I mostly used fresh fruit until my mom was horrified and told me to buy FROZEN fruit. The $$ saving factor of frozen fruit is absurd.

freezerfruit1Pantry

pantry1kitchen1

Glass jars. Not only are they pretty, it’s healthier to store your food in glass containers (vs. plastic).  It’s fun to decorate/label them too – I got the idea from our very own Peas and Crayons! 

jar1Using baskets, etc to group individual items. I’m experimenting with different samples of protein powder right now, plus I still have some GU hanging around for when I start half marathon training again.

kitchen2I finally broke down and have been buying the boxes of Clif Bars because it is cheaper than buying them individually!

Leftover produce bags are the perfect size for my juicer’s pulp canister. That way, when I’m juicing, I can just pull out the bag and plop it in the trash without having to clean the pulp out of the bin.

pulpbag1I showed you mine, now you show me yours!

Thanks as always to Jenn @ Peas and Crayons for hosting What I Ate Wednesday! 

Looking Back: Juice Cleanse

Soooo, the juice cleanse taught me a lot of stuff.

greenjuice3A whole lot of shit happened during those three days: some good, some bad, and a little ridiculous thrown in.

Would I do it again?

Meh. I feel the same way about a juice cleanse as I do skydiving – once is enough.

PROS

  • The physical effects

I had a much easier time waking up in the morning, which we all know is a huge issue for me. I swear on my life that my hair got longer (useful when you’re growing out your bangs) and I definitely felt lighter and less bloated.

  • Getting to know more about food

That’s what my whole “journey” is about, right? I found it hilarious that beets look soggy and juicy when they’re raw. I thought all along that when they got that droopy look, they were cooked. I also never thought about peeling a lemon like an orange before. I’m so smart.

  • Tasting ingredients now

I would never have thought I would be able to take a bite of something and taste the parsley or agave nectar in it. Oh yeah, and the ginger. Unfortunately, I realize now that Kung Pao has lots of ginger.

CAB4CONS

  • Staying strong

Juice cleanses are depressing. At least they are for me. I like thinking about what I’m going to eat for my next meal. It’s what part of the fun in life is about. Placing extreme limits on yourself surprisingly is not very much fun.

  • Low energy

I took my resting heart the first night of the cleanse and it was 66 beats per minute. That is super duper slow for me, which was almost a little alarming!

  •  Fogginess

I kept getting caught saying the wrong words in sentences. For example there was a lot of:  “I put the fridge in the juice.”

fridge1WHAT WORKED

  • Avoiding Instagram and all of the blogosphere

Dealing with the glorious pictures of everyone’s delicious-looking food was most definitely going to be too much for me.

  • Mixing it up

Playing with temperature worked. The variety of hot (nut milk) and cold (frozen lemonade) tricked my mind into thinking it was having exotic meals.

frozenspicylemonade

  • Double duty

I made and packed the juices in twos, threes, and fours. On the first night, I prepped my green juice for Day 2 and Day 3 at the same time. Four juices took me an hour and a half to make. All that washing and peeling and chopping and cleaning takes a while. However, it was nice to have it all done in one go.

  • 2013-06-03 09.18.57-2In person food avoidance

I didn’t eat with office people at lunch, and Tuna was a saint and tried not to eat or even talk about food in front of me.

WHAT I WOULD CHANGE

  • More prep

I wish I had eaten a little bit healthier during the week or two leading up to the cleanse, though I didn’t do too bad on that front. But weaning myself off of caffeine? That is a must.

  • Distraction

Distraction seems to be the key when it comes to surviving a cleanse. It was hard to watch sports because of the commercials for Pizza Hut and Taco Bell. Even people eating in Game of Thrones made me jealous. So – I guess I mean distraction that doesn’t involve food.

  • Following up

I just missed food so much, which made me over-indulge after the cleanse.

*******

I have a whole new appreciation for kale.

Thanks as always to Jenn @ Peas and Crayons for hosting What I Ate Wednesday!

Juice Cleanse, Day 2

The night between Day 1 and Day 2 I had lots of really vivid dreams and I remembered them once I woke up! That’s definitely a surprising side effect from the cleanse.

Thank gawwwd I didn’t have a headache anymore, and I was not hungry. Both good things.

I hopped on the scale and was excited to see that I was down 3 lbs. This shit was actually working!

Weirdly enough, I had an easier time getting up in the morning than I usually do. I also felt like my mind was a bit sharper in the morning – even without coffee.

The day passed in two(ish) hour increments, spent waiting for the next time I could have my juice. Not because I was hungry, I just wanted to consume something.  Every hour and a half I would start to feel a little more drained, a little weaker. I could seriously tell that my body was soaking up the nutrients in the juice when I re-fueled, which is kind of a strange feeling and hard to describe!

Here’s the juice schedule I followed:

Juice 1: 9:30 am
Juice 2: 12:00 pm
Juice 3: 2:30 pm
Juice 4: 4:30 pm
Juice 5: 7:00 pm
Juice 6: 9:00 pm

I could not wait for Juice 2, my absolute favorite juice by far.

PAM1P.A.M. is a pretty simple juice: a ton of pineapple, and some apple and mint. It was extra cool because I got to use my mint from my mint plant that I harvested and have yet to kill (nbd, hell is freezing over).

PAM3

I haven’t really tried pineapple before, and I think the only time I’ve ever had pineapple juice was with a bunch of vodka in Hawaii. At least now I have one juice from the cleanse that I genuinely love and will keep making!

Everything continued smoothly the rest of the day until Ginger-Gate.

CAB4*Side note: I’m talking about ginger root – which I had to ask the grocery store worker for because I was wandering around looking for pink ginger like the kind that comes with sushi. Turns out that the pink ginger is made from artificial dye. Who knew.*

The first night I had C.A.B. I didn’t put any ginger in the jar because I ran out of room. Beets make a lot of juice.

CAB1It wasn’t the best thing in the world, but it was filling, and I liked the carrot juice in it.

CAB2The measurements I used were:

  • 1 apple
  • 1/2 lemon
  • 2 giant carrots
  • 3 beets (I did not juice the greens)

On Day 2, I prepped my C.A.B. juice to take to Tuna’s. Since I’ve never used ginger before, I didn’t know how much to put in the juice (and was apparently too lazy to google it for some reason).

So, I proceeded to juice about half of the amount shown in the picture above. *See evil.

The kitchen sure smelled like sushi, but I didn’t think much of it. I packed up my juice and headed on over to Tuna’s.

When I got to his place, I stuck a straw into my mason jar and took a huge gulp.

Omg.

Too. Much. Ginger.

That was the first time I considered stopping the juice cleanse. I needed to have something for dinner, and I was not about to drink that crap. I panicked.

Tuna suggested I water it down. Still foul. I tried to put some ice in it and stir it around. Nope.

All I could do was hold my nose, chug half of it, and try to keep it down. The latter was hard to do, but I did.

I brushed my teeth but was still hurtin’. It was time to resort to Tuna’s mint gum.

mintgum You’re not supposed to chew gum on a juice cleanse because it supposedly tricks your stomach into thinking it needs to digest something, but that’s okay. Funny how ginger is supposed to be soothing for your stomach, but it upset mine for the rest of the night.

Day 2 lesson learned: try the juice before you take it to go.

I have now sworn off ginger. For life.

Thanks as always to Jenn @ Peas and Crayons for hosting What I Drank Ate Wednesday!

Juice Cleanse Grocery List

After our last trip to Eastern Market, I knew I wanted to come back and get lots of produce before my big juice cleanse. So Saturday morning, some friends and I headed on over to check it out!

We found almost everything I needed for a [slightly] cheaper price than Whole Foods and probably a lot fresher too! A lot of the veggies I bought still had the roots on them – and you can’t beat the size of some of this stuff.

Look at the giant carrots!

bigcarrotsAnd I got a huge bushel of beets for $3.50.

2013-06-01 13.11.18-1My bags started to get pretty dang heavy, so I kept ploppin’ them down while I bought more goodies. Thanks for being my personal photographer for the day, Mal!

bag1spinachparsleycelery

apples1

lemons1I don’t think my fridge has ever been as full as it was after this trip.

fridge1Yeah, it’s nice to have really fresh veggies for juicing, but that also meant they were on the dirty side. Solution = wax paper.

I am basing my juice cleanse on BluePrint’s Renovation Cleanse, their three day beginner cleanse.

juicecleansegrocerylistredoMaking the juices myself is definitely a daunting task, but I’m glad I’m doing it this way. I went to the store to get the last few items and spotted the actual pre-made juices from BluePrint. Look at the prices. Seriously? I was able to get all of the ingredients on the above grocery list for a third of the price that the cleanse would cost if you bought the juices already made.

wholefoodsjuicesHere goes nothin’!


Stove Popped Popcorn

I bought popcorn kernels a few weeks ago after I heard that stove popped popcorn is healthier than microwave popcorn [it doesn’t have added butter, etc].

The kernels were sittin’ up in the pantry for a while, so I almost forgot about them until I walked out of my room one day and Tuna had made some! He looked up how to make it on a blog.

popcornmain

Ingredients:

  • 1 cup popcorn kernels
  • 3 tbsp canola oil or vegetable oil
  • salt to taste

You’ll need: a large pot with a lid.

popcorn1

popcorn2Directions:

Pour the kernels into the pot and add oil (don’t add the lid yet).

Turn the burner to medium-high.

Heat up for about 4 minutes. While it’s heating, shake the pot back and forth on the burner to distribute the heat evenly.

When the first kernel pops, put on the lid. Keep gently shaking the pot for another 3/4 minutes until the popping slows and stops.

Add some creative seasoning [suggestions, please!] and enjoy!

popcorn4

popcorn10

popcorn6Thanks as always to Jenn @ Peas and Crayons for hosting What I Ate Wednesday!

FitKit Monthly Guest Post – How to: Make A Frittata

Remember when I told you about FitKit awhile ago?

FitKit is a place where nutrition is made personal for everyone. Their mission is to build a community around making health and fitness transparent.

I’m super pumped because I’m going to be a monthly contributor to the FitKit blog!

Want to know how to make a frittata? Of course you do….

frittata2Check out my guest post here!

How To: Seed A Pomegranate

I wasn’t feeling very good this weekend, but lucky for me, my friend Mal stayed in with me on Friday and did cool things with me like figuring out how to get all of the pomegranate seeds out of a pomegranate.

It all started with a trip to Whole Foods to pick up ingredients to make quinoa sliders.

Since pomegranates are currently in season (in the winter) they are all over the grocery stores right now. We were thinking about buying one of the small tubs of pomegranate seeds, but then looked at the price tag.

Yeah, not going to buy a bunch of seeds for $8.00. (Unless they’re chia seeds, of course).

So instead, Mal was nice enough to buy us a fancy Whole Foods pomegranate for $2.99 and she we studied multiple youtube videos of how to cut open a pomegranate and get out all of the seeds.

Thank you for being my pom model, Mal!

First, cut off the nubbins at the end of the pomegranate.

pomegranate1Cut the pomegranate in half vertically – the ends where the nubbins were should be horizontal (don’t cut through those).

Look at all those juicy seeds!

pomegranate2Put the pomegranate in a bowl of water (or over-sized Tupperware of water) to soften it up. Be careful, because the seeds can pop and stain clothes, counter tops, and cutting boards.

Start breaking the seeds out of the rind.

pomegranate3pomegranate4Go slowly – and peel ’em all out!

pomegranate6Once the seeds are out, toss the rind.

pomegranaterind5Rinse the extra bits of rind off of the seeds and dry them on a paper towel.

pomegranate8Perf for a little snack during Law and Order SVU…

2013-01-04 23.12.52with some dark chocolate chips. 🙂

pomegranate7