Chicken and Veggie Foil Packets

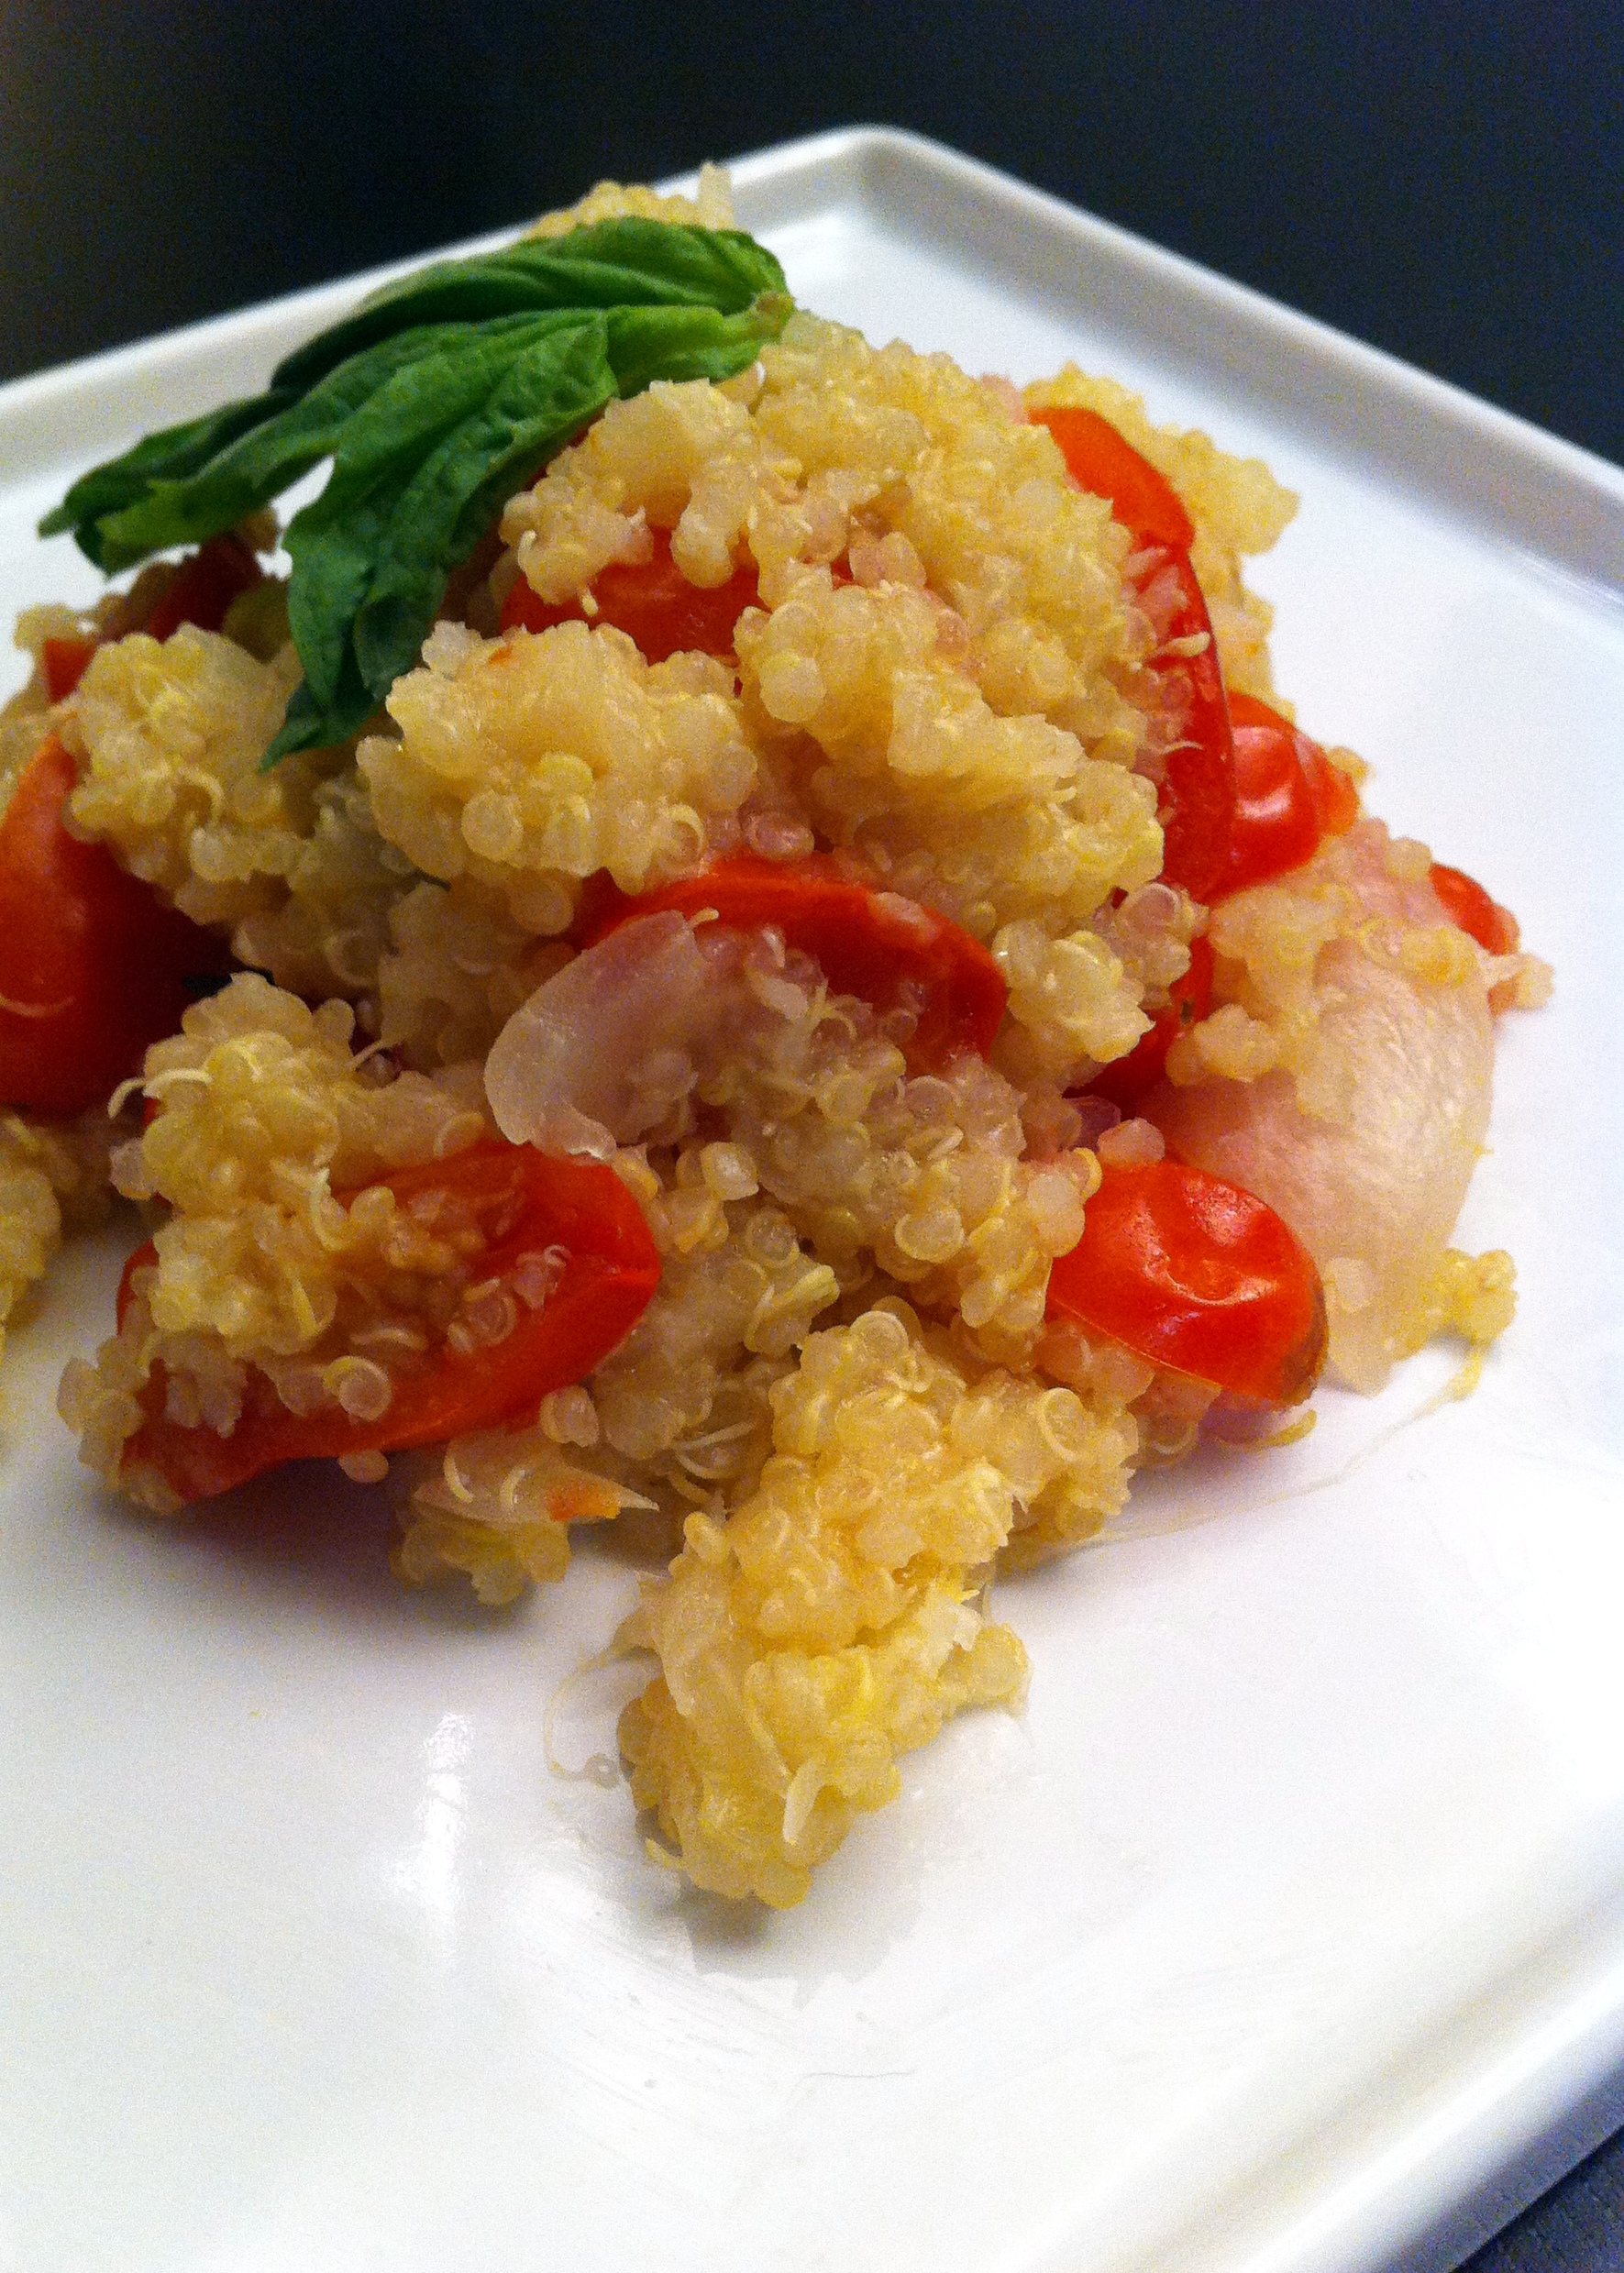
Making this recipe reminded me of making foil packets on the fire, while camping during the summers in my tween-years.

So easy, tweens can do it!

No – really.

My new (old-school) favorite way to cook meat: because you basically slap it on some foil and roll it up in a pop-tart-like sandwich and you’re good to go. Clean up involves crunching up the foil and throwing it in the trash.

Cooking For Dummies at it’s best.

chickenandveggiefoilpacksmainpic


Serves 2

You will need: aluminum foil

Ingredients: 

  • 2 chicken breasts
  • 2 small zucchini, sliced thin
  • 2 plum tomatoes, chopped
  • 1 red bell pepper, chopped
  • 3 green onions, chopped
  • 1 tbsp extra-virgin olive oil
  • 1 garlic clove, minced
  • 1/4 tsp dried oregano
  • dash of red pepper flakes
  • salt and pepper
  • 1/8 cup fresh basil, minced

Directions:

Preheat oven to 450°F.

Chop (and pat dry) the zucchini. Continue on choppin’ the bell pepper and green onions then toss in medium size bowl.

Cut up tomatoes and throw into a second bowl.

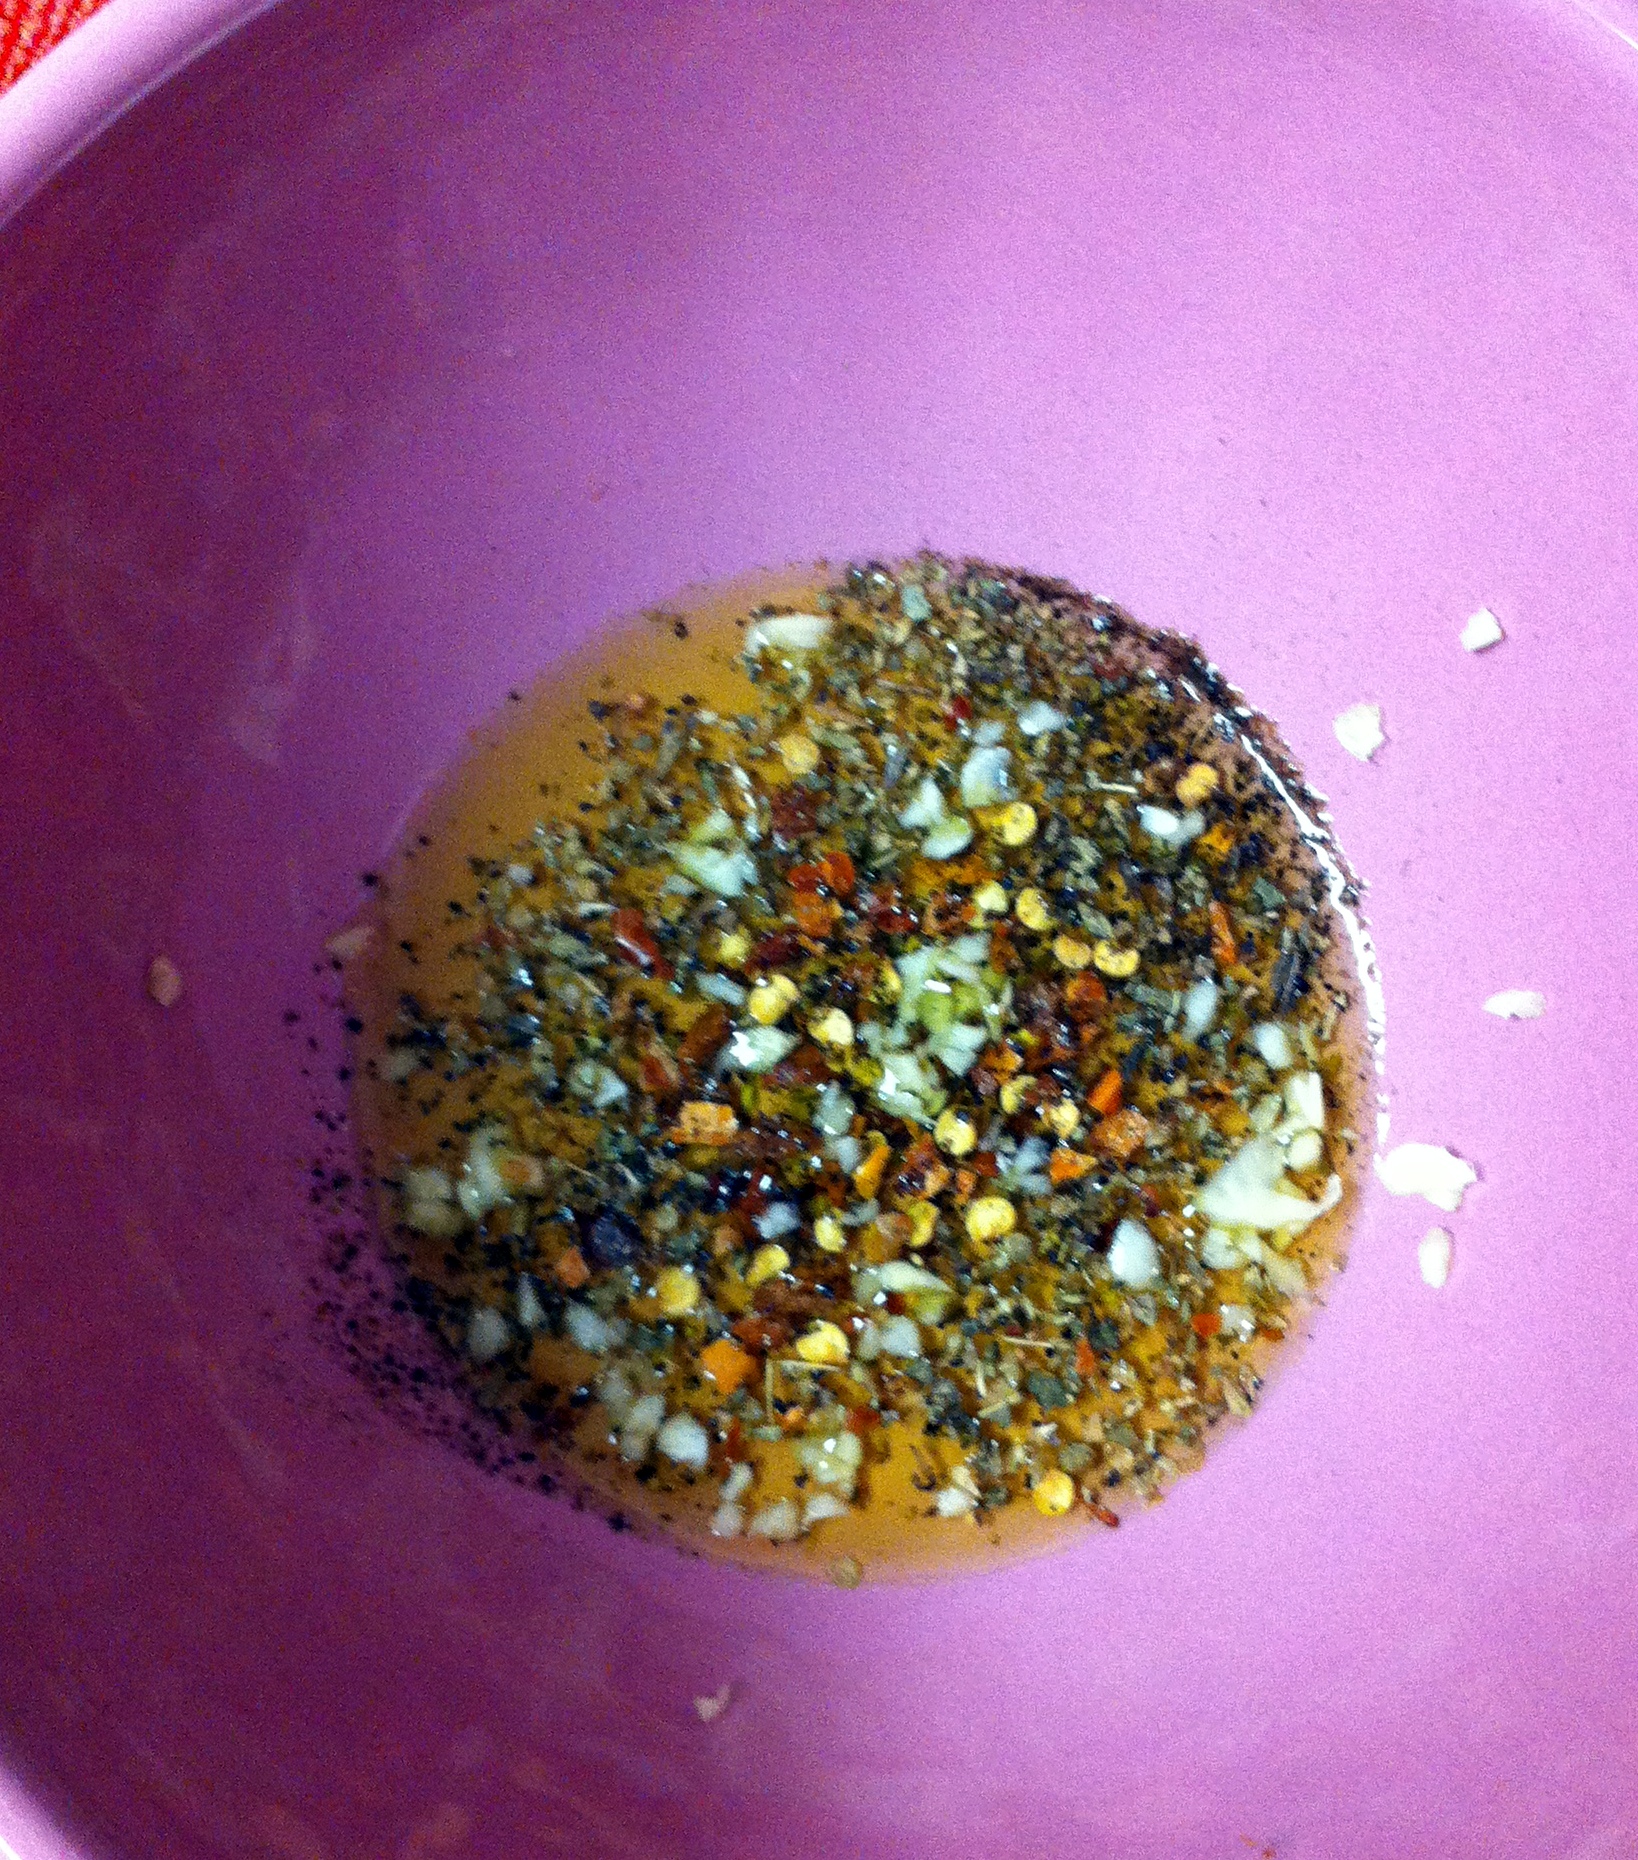
In a separate small bowl, combine garlic, oregano, red pepper flakes, oil, and a dash of pepper.

Pour half of the mixture into the first bowl of vegetables and and the second half to the tomatoes. Stir both bowls of veggies.

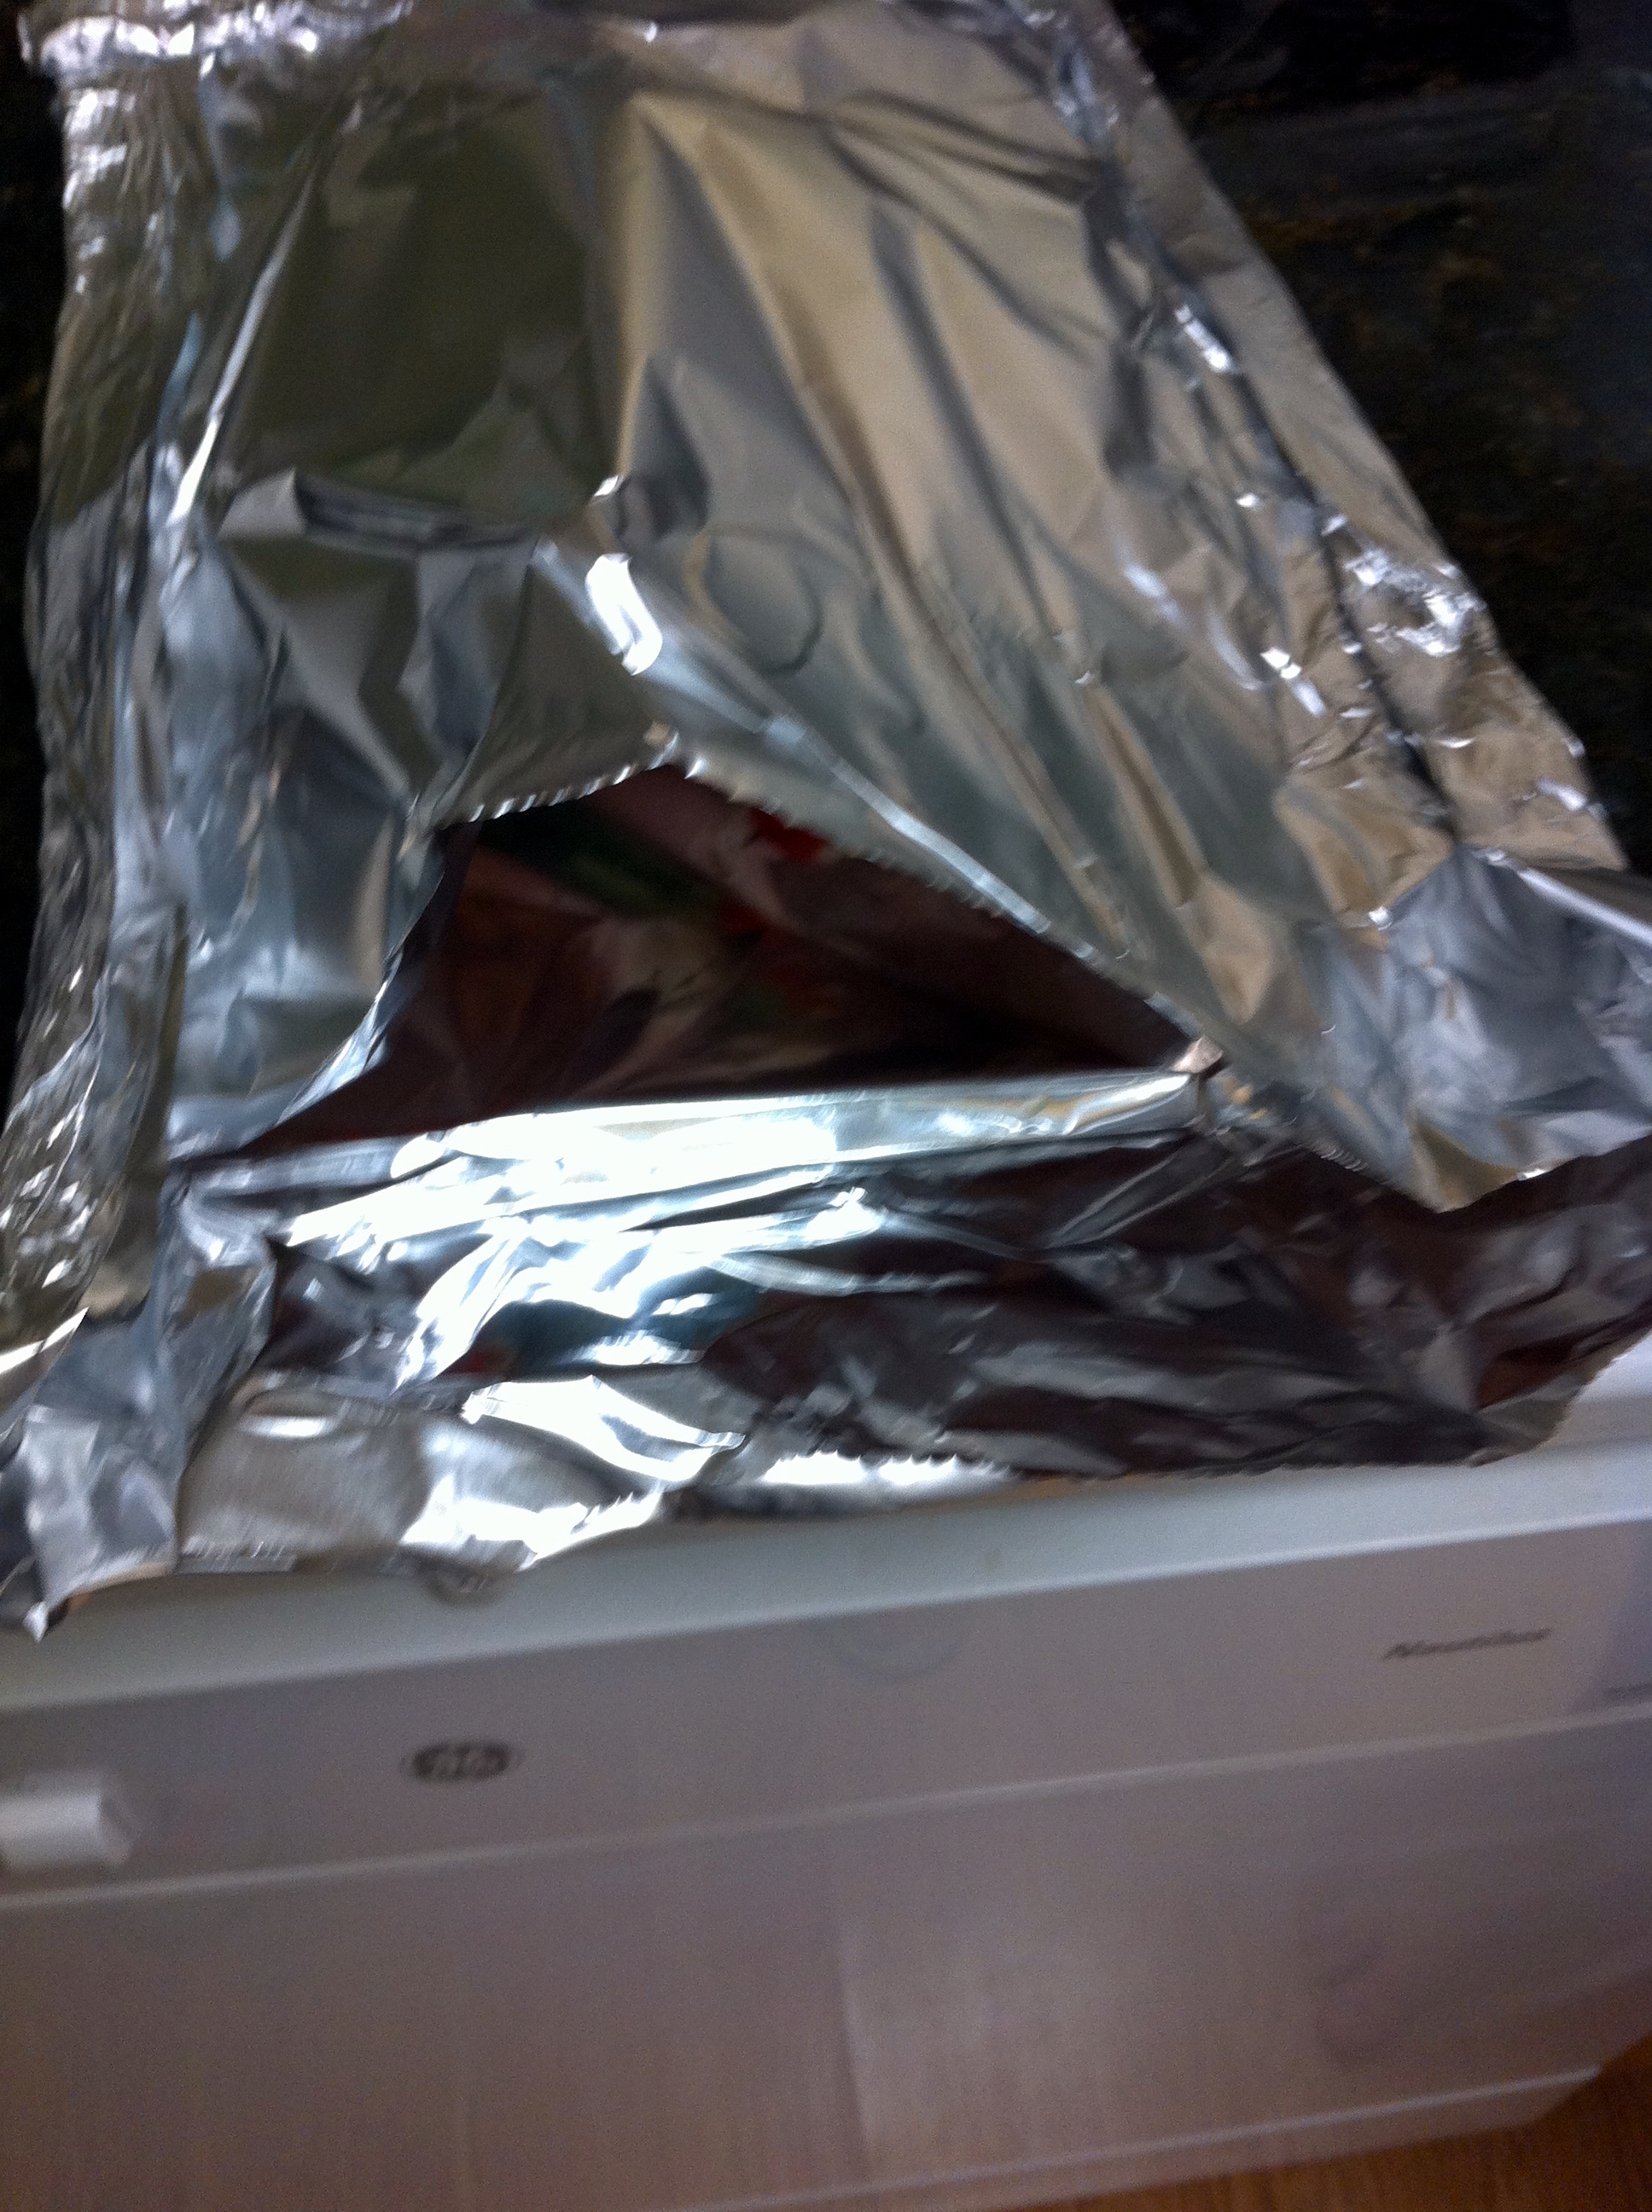
Cut 4 12 inch sheets of foil – keep 2 as a main base, lay two aside.

Plop half of the zucchini mixture in the middle of each of the 2 main foil squares.

Add 1 chicken breast on top of each zucchini mixture. Sprinkle with salt and pepper.

Add half the tomatoes on top of each chicken breast.

Place the two foil tops on the meat and roll edges of foil into packets.

Put on a rimmed baking sheet and cook for 29-30 minutes.

Open the packets carefully, sprinkle with basil and serve!

chickenandveggiefoilpacks3


chickenandveggiefoilpacks4

chickenandveggiefoilpacks5

chickenandveggiefoilpacks6

chickenandveggiefoilpacks7

chickenandveggiefoilpacks8

chickenandveggiefoilpacks9

chickenandveggiefoilpacks10

chickenandveggiefoilpacks11


chickenandveggiefoilpacks1

We are at 3 for 3 with winning recipes adapted from or inspired by The America’s Test Kitchen Healthy Family Cookbook.

At this point, I’m just going to keep on going!

 Thanks as always to Jenn @ Peas and Crayons for hosting What I Ate Wednesday!

Spicy Corn Salsa

Maaaaybe we should start calling this blog “…Makes all the Recipes from America’s Test Kitchen Healthy Family Cookbook,” because it is AWESOME and everything we’ve made so far from there is delicious.

For some reason I have really been craving Mexican food lately. Ok – I am always craving Mexican food. In college I would eat Chipotle multiple times a week. Those were the days.

I originally wanted to make this recipe because I had a bunch of frozen corn in the freezer and figured I could use it up with this. Of course I got all pumped up to eat it and then realized you need to use fresh, NON FROZEN corn. I don’t really know why, the directions just ominously decree it. I obeyed and bought some fresh corn – even husked it and everything!

spicycornsalsamain1


Makes approximately 2 cups of salsa.  For a party size, double the batch. Eat with tortilla chips, on a burrito, atop a romaine salad – the list goes on!

You will need: paring knife, 12 inch nonstick skillet

Ingredients:

  • 1 ½ tbsp olive oil
  • 2 ears corn (slice off the kernels with a paring knife)
  • 1 red bell pepper, stemmed, seeded, and chopped
  • 1/2 jalapeño chile, stemmed, seeded, and chopped (if you want it extra spicy, add the whole thing)
  • 1 green onion, sliced
  • 2 garlic cloves, minced
  • 2 limes, juiced
  • 2 tbsp fresh cilantro, minced
  • Salt and pepper

Directions:

Heat 1/2 tbsp of olive oil in the skillet over medium-high heat for until warm.

Carefully add the corn and cook. Stir on and off until golden brown for about 6 to 8 minutes.

Dump the browned corn to a large bowl.

Stir in everything else.

Recommended but not necessary: cover and refrigerate for an hour or so – this will blend the flavors better!

Store in the fridge. Keeps for several days.

spicycornsalsa4


Thanks as always to Jenn @ Peas and Crayons for hosting What I Ate Wednesday!

Healthy(ish) Chocolate Chip Cookies

When I was lucky enough to receive a hand-me-down cookbook and kitchen-aid mixer last week, it meant I needed to do one thing.

MAKE COOKIES!

In order to have more cookies and less guilt,  it’s necessary to modify the classic chocolate chip cookie to be healthy(ish). How is this recipe better for you than usual? The cookies are a teensy bit smaller, have A LOT less butter, and substitute semi-sweet chocolate chips for dark chocolate ones.

Because dark chocolate’s good for you.  🙂

Tuna gave his stamp of approval – BEFORE I told them they were healthy. “They’re HEALTHY???” he asked in disbelief.

Well – healthyish.

All this cookie talk is making me hungry. ‘Scuse me while I go grab another…


healthyishchocolatechipcookiesmain1

This recipe was adapted from The America’s Test Kitchen Healthy Family Cookbook.

Makes 18 cookies

Ingredients:

  • 1 cup plus 2 tbsp whole wheat flour
  • 1/4 tsp baking soda
  • 1/2 tsp salt
  • 5 tbsp unsalted butter
  • 1/3 cup white sugar
  • 1/2 cup brown sugar
  • 1 tsp vanilla extract
  • 1 egg
  • 5 tbsp dark chocolate chips

Directions:

Make sure oven rack is in the middle of the oven and preheat to 375°F.

Line two baking sheets with parchment paper.

Combine flour, baking soda, and salt in a medium bowl and set aside.

Melt 3 tbsp of the butter in a small skillet on medium/high heat for 3-4 minutes until it starts turning brown.

Pour the browned butter into a large bowl and mix in the remaining 2 tbsp of butter until it’s all melted.

In the large bowl with the butter, combine white sugar, brown sugar, and vanilla extract.

Whisk in the egg. Let the mixture set a few minutes, then whisk again for 30 seconds. Repeat a few times to firm up the dough.

Stir in the flour mixture from the medium bowl and add 2 tbsp dark chocolate chips.

Scoop out a heaping tablespoons of the dough (one at a time) onto the baking sheets to form your cookie balls.

Press in a few chocolate chips on the tops.

Bake one sheet at a time, about 9-10 minutes. Rotate the sheet in the oven halfway through (after 4-5 minuteS).

Let cool on the baking sheet for 10 more minutes, then transfer onto a cooling rack.

DEVOUR!


howtobrownbutter


handmedownkitchenaidmixer


healthyishchocolatechipcookies1


healthyishchocolatechipcookies2


healthyishchocolatechipcookies3

 Thanks as always to Jenn @ Peas and Crayons for hosting What I Ate Wednesday!

Tomato Basil Quinoa

I am all about quinoa right now. I can’t get over how easy it is to make and how versatile it is. It’s good as a side dish with chicken, alongside crackers as a snack, or plopped on a bunch of salad for lunch. That’s pretty much the order I ate this in. 😉 Tuna has decreed it into the usual rotation, so I’m excited to eat it lots this spring and summer!

tomatobasilquinoamain1

Serves 2 (main) or 4 (side dish)

Ingredients:

  • 2 cups water
  • 1 cup uncooked quinoa
  • 2 cloves of garlic, minced
  • 1 onion, chopped
  • 10 oz grape tomatoes, cut in half
  • 1 tsp salt
  • 1 tsp red pepper flakes
  • 1 tablespoon olive oil
  • 1/8 cup basil leaves, chopped and for garnish
  • 1/2 cup shredded mozzarella cheese

Directions:

Add water and quinoa to a medium/large pot.

Add in garlic, onion, tomatoes, salt, and red pepper flakes.

Heat the uncovered pot to a rolling boil.

Cover, reduce to simmer, and cook for 15 minutes.

Remove from burner and let cool for 5 minutes.

Toss in basil and olive oil to serve.

tomatobasilquinoa


tomatobasilquinoa1

Thanks as always to Jenn @ Peas and Crayons for hosting What I Ate Wednesday!

One Small Change at a Time

As spring quickly approaches, I am starting to get nervous about taking off my winter cardigan…

….sooo to get back on track I am trying to focus on portion control. I’m getting to the point where I know what’s healthy and I try to eat a lot of nutrient-food. But it can be hard to stop at half of the bag.

One small change I’ve been working on lately is to split food items into small snack sized portions.

traderjoessweetandspicypecans

Just think of it as  200 100 calorie snack packs. 🙂

portioncontrolcleaneating

A second small change: my new visual for mealtime presentation.

I’m training my brain to think of  dinner portions like how they would be served at a fancy restaurant. Less food for me, please.


steakandbroccoli

Sometimes it’s easy to get down on yourself for not following a diet 100% exactly like you think you should: i.e., number of calories, cutting out food groups or certain ingredients. When that becomes overwhelming (like it has been for me a little bit this winter) it’s important to change your perspective. Like focusing on a healthier lifestyle with one small change at a time.

Thanks as always to Jenn @ Peas and Crayons for hosting What I Ate Wednesday!

What are some healthy food habits you’ve been into lately? 

Does your diet go through phases or are you pretty good about sticking to it?

Clif Balls

clifballsmain

For years I have been eating Clif Bars as a main snack staple.

clifballs1

Obsessed. I always have one in my purse, just in case hangriness hits and always eat one for my afternoon snack at work. They’re seriously my go-to. Clif Bars are definitely a good way to curb hunger and are a healthy alternative to eating chips or crackers when you need a little something to tide you over ’til dinner.

Usually I don’t care too much about calorie counting whenever I’m eating clean or training for a half marathon – because just fueling your body is often the most important thing in that case! But when I’m not running every day and my jeans seem a little tight I do feel the need to focus on more nutrition with less calories.

It is quite depressing when MyFitnessPal gives me a 1200 calorie goal for the day (though don’t worry, I usually consume much more than that! 🙂 ) and 250 of those are taken up by my little Clif Bar snack.

I usually gobble them up in two bites and my brain is not satisfied by chewing up my snack before even realizing I’m eating it! Sometimes I exhibit restraint and eat half of a bar but then all you have is an open wrapper with a half eaten blob that ends up spreading stickiness all over your lunchbox. No thanks. 

A great solution to the slammin’-down-the-Clif-Bar-problem are the ever popular oat bites that are taking over the blogosphere. I LOVE these babies and make them occasionally on the weekend when I have extra time to spend in the kitchen. 

You can find my “No Bake Chocolate Peanut Butter Bites” HERE and my take on “No Bake Cookie Dough Bites” HERE!

The only issue?

Truth.

Lately when I don’t have gobs of time to make gorgeous homemade bites I have been doing the next best thing.

Yanking apart clif bars and rolling ’em into the fastest health food balls ever created.

I usually split them into three or four chunks.

formclifballs1

Some are easier to form than others! When going gets tough, there’s always the hang rolling pin technique.

smushclifballs1

It’s like a health food shortcut.

clifballs3

1 ball = 63 calories.

clifballspackup

My afternoon snack just got a lot more interesting!

Tell me:

Do you eat an afternoon snack? What do you usually have?

Thanks as always to Jenn @ Peas and Crayons for hosting What I Ate Wednesday!

Veggie Skewers

I promise this is the easiest thing ever to make and is really good for you. Done and done.

It is also nice to get in some veggies other than in salad form (especially in the winter!).

veggieskewersmain

Don’t forget they are low in calories, fancy-looking…I could go on forever!

Oh yeah, and good for vegan, gluten-free guests. 🙂

Ingredients:

  • 1 zucchini squash (thickly sliced)
  • 1 yellow squash (thickly sliced)
  • 1 red bell pepper (sliced into pieces)
  • 1 red onion (sliced into pieces)
  • 1 tbsp olive oil
  • 1 tsp salt
  • ½ tsp garlic powder
  • ½ tsp paprika

Directions:

Preheat oven to 400ºF and line a baking sheet with parchment paper.

In a large bowl, toss zucchini, squash, red pepper, and onion with olive oil and seasonings.

Stab a wooden skewer through the veggies (stacked as you please).

Bake for 20 minutes and serve!

veggieskewers1

Thanks as always to Jenn @ Peas and Crayons for hosting What I Ate Wednesday!

Mexican Seafood Scramble

This recipe always ends up happening when I’m too lazy to make rice for a mexican bowl. Ok…and for when I’m hangry right when I get home and need a meal FAST.

Tuna was a little skeptical of the addition of shrimp to a deconstructed breakfast burrito, but this delish dinner ended up convincing him.

Glorified scrambled eggs for the win. 

mexicanseafoodscramblemain1

Serves 2-4

You will need: a large skillet, whisk, spatula

Ingredients:

  • 1 avocado
  • 8 eggs
  • 1 cup cooked shrimp, chopped
  • 1/2 cup red onion, chopped
  • 1 cup hot salsa
  • 1 cup cooked corn (I used frozen kernels)
  • salt & pepper, to taste

Directions:

Heat lightly greased skillet and add onions.

Whisk eggs in a separate bowl, then add to skillet.

Scramble the eggs and add in cooked shrimp.

Top with salsa, corn, and mashed avocado.  Add salt and pepper to taste and serve.

YUM!

Thanks to Jenn for hosting What I Ate Wednesday!

Orzo “Risotto”

The freezing temps of late have made me only want to eat WARM things. There are only so many soups that I like 😉 so I am being forced to get creative with new, WARM recipes to throw in the weekly mix. This mock risotto is a definitely a good hearty dish you can come home to after a long day battling the winter weather!

I think I am starting to have an orzo obsession.

orzorisottomsainpost

This recipe was inspired from HERE!

Serves 2-4

Ingredients:

  • 2 tbsp olive oil
  • 2 cloves garlic, minced
  • 1/2 onion, chopped
  • 28 oz vegetable broth
  • 2 cups uncooked orzo pasta
  • 1 cups frozen peas
  • salt & pepper

Directions:

Heat a saucepan over medium heat.

Add olive oil, onion, and garlic.

Cook while stirring occasionally for 3 minutes.

Add broth and stir until boiling.

Add pasta.

Reduce heat to low and cover.

Simmer until all the liquid is absorbed (about 15 minutes) while stirring occasionally.

Microwave frozen peas and toss into orzo.

Season with salt & pepper and serve!

uncookedorzo

garlicorzorisotto

garlicorzorisotto1 orzorisotto orzorisotto1 orzorisotto2orzorisottomain2 orzorisottomain3

Thanks as always to Jenn @ Peas and Crayons for hosting What I Ate Wednesday!

Choco-Nut Fudge Bites

I found this delish recipe when browsing Pinterest over the weekend.

Obviously I chose them for the chocolate. But the no-bake aspect is right up my alley and it helped that I already had all of the ingredients in the pantry.

My no-bake bites were inspired by the bars from HERE.

I originally made them as bars but they are pretty darn sweet – so I cut up the rest as bites in an attempt to eat less sugar. Unfortunately I still care to eat several bites at a time…

choco-nut fudge bites1mainYou will need: 9×13 inch pan (I used a glass pyrex), medium saucepan

Ingredients:

  • 1 cup peanut butter
  • 1/2 cup agave nectar
  • 1/2 cup  coconut oil
  • 2 cups oats
  • 1 1/4 cups dark chocolate pieces
  • 1 tsp vanilla extract

Directions:

Heat peanut butter, agave nectar, and coconut oil in a saucepan with the burner on medium-low and stir until combined.

Remove from heat. Add dark chocolate pieces, oats, and vanilla extract and combine until melted.

Pour into pan and cool in the fridge until hardened.

Cut into bars (you will need a big ole’ knife when it’s set) and enjoy!

Keep cool until ready to serve and store in the fridge.

darkchocolatepieces

choco-nut fudge bites3

choco-nut fudge bites2

choco-nut fudge bar1

Thanks as always to Jenn @ Peas and Crayons for hosting What I Ate Wednesday!